“Ghost” Windows XP for free
August 13, 2006 - Reading time: 19 minutes
Update: I wrote this article in 2005, but it’s still receiving lots of traffic. Please see my complementary article on “ghosting” Windows for Free with Open-Source Tools.
Update 2: I recently wrote an updated version of this article, featuring Macrium Reflect in place of DriveImage XML.
Update 3: Here’s another updated version of this article, this time featuring Paragon Drive Backup Express.
12.21.05
If you have ever had the pleasure of re-installing Windows XP from scratch, you know what a hassle it can be. The idea of endless tweaks, patches, driver hunts, reboots, and scouring the web for software does not exactly fill me with glee. Did I mention the reboots? For me, the worst part is the sinking realization that when I finish the endless tweaks and software installs, I may end up doing the entire process over again from scratch six-to-eight months down the road. Why? Masochism may be one answer, but a more probable answer is an unexpected bout of spyware, a rogue virus, or a bloated registry that is causing the system to behave erratically.
Surely there must be an easier way to create that “freshly installed” feeling. Of course, you could run out and purchase Symantec Ghost(tm) or some other commercial application that will allow you to create an image of an installation and then restore from it later, but isn’t there a way to achieve the same results without spending any money? Mac OS X has Disk Utility, which can create compressed disk images of drives or partitions from which you can later restore by booting off the install CD/DVD. Linux has several free utilities such as Partimage and Mondo Rescue or even the venerable “dd” command. Windows XP doesn’t have anything like this built-in.
Yes, some OEMs provide “restore CDs” that erase all data and restore the operating system to its “factory-fresh” state. While that’s nice, what if you don’t like the way “they” set up your system? What if you want to create an image of your operating system the way YOU like it?
Enter DriveImage XML. As written on their site, DriveImage XML is an “easy to use and reliable program for imaging and backing up partitions and logical drives.” Aside from the bizarre image on their site of a man jumping into a pool with the caption, “You saved my life today…”, I’ve found it to be a solid program. Of course, I had to test everything before I could write about it, so in the interest of science I methodically backed up my files, re-installed Windows, tweaked, and then got to know DriveImage XML. This process worked for me. However, you must USE THIS GUIDE AT YOUR OWN RISK. I cannot be held responsible for any harm done.
That said, the basic system specs that I used are as follows:
Processor: P4 2.66 GHz
RAM: 2GB PC2700
Hard Disks: 120GB WD “Special Edition” IDE; 300GB Maxtor S-ATA
Optical Drives: NEC CD-RW and NEC DVD-RW
Requirements:
To successfully image and restore your system using this method, you will need the following:
- A Windows XP Home or Professional install disc. According to their site, DriveImage XML will only run on XP. If a daring Windows 2000 holdout wants to try this, let me know what happens.
- A CD or DVD burner. This is required to create the “Live CD” environment. A CD burner is good. A DVD burner is better. Two optical drives are ideal, but not required.
- While not absolutely required, a spare partition or spare hard drive will make things more convenient.
Note: If you do not have a second optical drive, you must have either a spare internal partition or hard disk. An external hard disk works as well. The point is that you need a place to store the image outside the system drive for restoration purposes. I suppose that it is entirely possible to build a “live DVD” that also contains the restoration image provided that you have enough space on your DVD, but I did not explore this option.
Ready to get started?
Driveimage - Preparation
Imaging and restoring the operating system is really quite simple. However, there are a few preliminary steps that must be done. Luckily, several of these steps only have to be done once.
The entire process in a nutshell:
- Backup your current files!
- Slipstream Service Pack Two.
- Create a Windows “Live” CD.
- Add the DriveImage XML plug-in.
- Configure your system.
- Create the “hot” image.
- Archive the new image.
- Restore the image.
- Alternatives and asides.
1. Backup your current files!
It goes without saying that before you try ANYTHING that could potentially cause data loss, you should create backups of your critical files. In fact, you should have some sort of backup scheme anyway. Burn everything to CDs or DVDs. Buy a spare hard drive (or two). Create a spare e-mail account just for archiving data. Do whatever it takes to keep your critical files safe. Only when you are sure that everything is secure, proceed to step two.
2. Slipstream Service Pack Two.
This step is only required if your current Windows install disc does not contain either service pack 1 or 2. To create the Windows “Live” CD, you must use an install disc that contains a service pack. Detailed instructions to how to do this go beyond the scope of this article, but one great tutorial is on Paul Thurrott’s site. Once you have (or have created) a “slipstreamed” install CD, proceed to step three.
3. Create a Windows “Live” CD.
Note: a DVD should also work for this procedure.
While Linux “live” CDs such as Knoppix and Mepis have been around for years and are freely downloaded, it is not the case with Windows. Yes, you *can* create a Windows live CD, but only with media you actually own. It is illegal to give away or download a Windows live CD. That said, we are going to use BartPE (Bart’s Preinstalled Environment) to create the live CD. While there are detailed instructions on the aforementioned site, I will also provide some rudimentary instructions. At the time of this writing, the current BartPE version is 3.1.3.
- Download the BartPE package and install it (or just use the ZIP package). For the sake of consistency in this tutorial, I will use “D:\bartsPE” as the reference path for the BartPE files. Adjust your path accordingly.
- Run the “pebuilder.exe” file. In the “source” section, you need to provide the path to your Windows installation files. While you can direct it to the Windows install CD in your optical drive, I found it much more convenient to just copy everything to a folder on the hard drive. If you want to do this, create a new folder, such as “D:\bartsPE\XPCD”. Copy everything from your slipstreamed Windows XP SP2 CD to this folder. When it is finished, point the “source” path in PE Builder to the “XPCD” folder.
- Enable the option to create an ISO, and give it a file name, such as “D:\bartsPE\pebuilder.iso”. You are now set to create the live CD. Now is a good time to go ahead and test it. Using a CD-RW for this is very convenient, as you can test and re-test without wasting CDs. Hit the “Build” button and watch it work. When finished, burn the ISO that it created to CD (as a disc image, not just a regular data file). Make sure your bios is set to boot from CD, and then reboot with the CD in the drive. With any luck, you should have a working Windows live CD.
4. Add the DriveImage XML plug-in.
Now that you know how to create a live CD using BartPE, we can add a plug-in for DriveImage XML. Before we continue, a brief explanation is in order. DriveImage XML does a great job of creating backups, even directly from the system drive, but these backups require a running Windows environment to restore the images. While this is great provided that your system stays healthy, what happens if a virus erases your hard drive? What happens if Windows fails to boot for some reason? What happens if your hard drive dies and you want to swap it with another? Get the picture? Also, you cannot restore an image TO the system drive (usually C:\) if you are currently running the operating system FROM the system drive. This is where running DriveImage XML from a live CD comes into play. Without the live CD, you would be unable to restore an image because it cannot overwrite itself. With the live CD, even if you completely swap your hard disk for another, you can restore your operating system to its previous state.
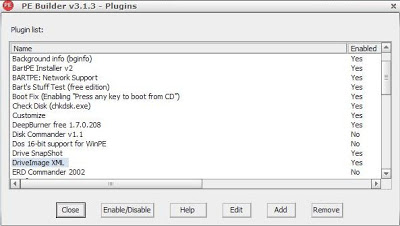
DriveImage XML integrates into BartPE as a plug-in. This plug-in is currently located under “Available Plugins” on this page of the Runtime Software site. Download the CAB file. Back in PE Builder, click the “Plugins” button. What you see now is a list of utilities that come with BartPE by default. Many of them can be enabled simply by selecting the desired plug-in and clicking “Enable/Disable.” Some of them require extra steps though, and clicking the “Help” button should provide information on the extra steps required.
As you may have guessed, we’re going to click the “Add” button to add the newly acquired CAB file for DriveImage XML to BartPE. Navigate to the CAB file and click “Open.” Once it’s installed, it should automatically be enabled. If it is not, click the “Enable/Disable” button.
If you are interested, you should consider adding more utilities to your new live CD, such as antivirus, spyware removal tools, or a CD-burning application. When finished, build your new CD and burn the ISO to disk.
Now it’s time to create the image.
Driveimage - Creation
5. Configure your system.
Now we’re getting to the fun part. Aside from the backups, everything that we’ve done so far only needs to be done once. You only need to slipstream SP2 once. You only need to create the live CD once. Now it’s time to configure your operating system the way you want it. You have several choices here. You may like the operating system just the way it is right now. You may want to create a state in which you have only the major applications that you need. I chose to revert to a fresh install plus all the Windows updates and drivers that I need, tweaked just the way I like it. If you do not wish to go through a re-installation right now like I did, you should at least ensure that you are preserving a sane, healthy environment. Scan for viruses and spyware. Defrag. Remove any applications that you don’t want. Do all the little maintenance tasks that you wish. I leave it to you to discern what is best.
6. Create the “hot” image.
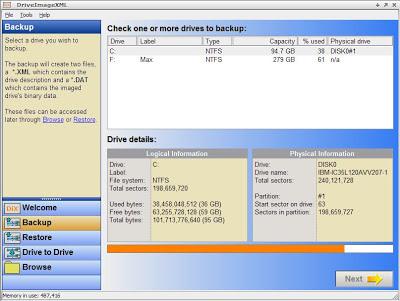
If you have not already done so, install DriveImage XML. As an alternative, you could boot from your new live CD and create the image from there, but note that this will probably take significantly longer than running directly within Windows booted from your hard drive. Using DriveImage XML is actually quite simple. Once launched, click “Backup” on the left side. Select the drive or partition that you want to image and then follow the included wizard. Choose a destination to save the image. This does not have to be saved to a different drive or partition, though you may find it more convenient to do so if you have one available. Though it slows the image creation process slightly, I suggest enabling the “compression” option, as this can reduce the size of the image as much as 40%. Only select the “Raw mode” option if you want to create an exact copy of everything on your drive, including all the empty space. With that option enabled, you will not be able to alter the size of partition to which you want to restore. Most people will not need this. “Split large files” means that each chunk of data will fit on a CD.
When you’re ready, start creating your image. This may take a long time, depending on how much data there is to archive. My freshly-installed system with all updates and drivers plus a few critical applications compressed to about 3 GB, and it took almost exactly thirteen minutes to complete. Not bad at all.
7. Archive the new image.
At this point, you should consider backing up your new image to some form of external media. This is an absolute necessity if you only have a single hard drive or partition. For my purposes, I used a single DVD-R. I labelled it “Fresh Install” and I can use it in conjuction with my BartPE live CD. An external hard drive would also work nicely for this, but make sure that it works with BartPE *before* you find yourself in a disaster-recovery scenario. Leaving the image on a second internal drive or partition should be ok as well, though I encourage you to eventually copy it to some form of external media.
Now that you have your backup, let’s talk about how to restore it.
Driveimage - Restoration
8. Restore the image.
No backup solution is complete unless you *know* that you can actually recover the files from your images. Until you know that you can restore your files, your new image isn’t worth a pitcher of warm spit. Yes, I said spit. Let’s ensure that your new backup is working, shall we? You DID back up your files originally, right?
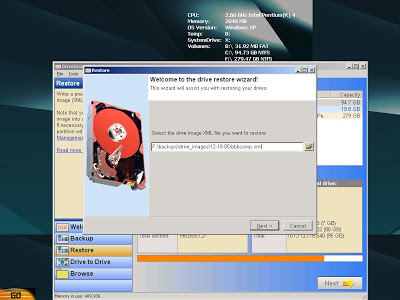
Boot from the BartPE live CD and launch DriveImage XML. Insert any media that contains your backup image. Click “Restore” on the left side and start following the wizard again. Choose the XML file that you want to restore. For my purposes, I chose to restore the image from its location on my second hard drive, though I could also have inserted the DVD-R containing the image into my second optical drive.
Next, select the drive or partition to which you want to restore. If this is a new hard drive that does not yet have any partitions, DriveImage XML also gives you the option to launch the “Windows Disk Management” utility, which you can use to create a new partition. You will have to confirm your choice a couple of times, and the final time you actually have to type a few characters into a text box and then click OK. When you have ensured that the correct image is going to restore to the correct partition, cross your fingers and click OK. Here goes!
Now watch helplessly as all of your files are erased… and hopefully restored with the files in your image. Believe it or not, it only took my computer exactly 8 minutes and 40 seconds to restore the image.
When it is finished, reboot and remove the live CD. If your system comes back to life, congratulations, you have successfully implemented an image/restore backup system, all for free. If your system exploded or drank all of the soy nog in your refrigerator, I offer my condolences. Re-read the instructions, and better luck next time.
9. Alternatives and asides.
Though this entire process may seem much more complicated than a commercial equivalent like Symantec Ghost, it really is not. From this point on, all I have to do when I want to backup my system is to run DriveImage XML from my system drive to create an image. If I ever need to restore from it, I simply boot my live CD and restore the image. There’s no more slipstreaming or building live CDs. I’ve never used Norton Ghost(tm) or any other paid backup solution, so I cannot draw a direct feature comparison.
While DriveImage XML offers a lot for free, I do have some suggested improvements. I’d like to see a way to automate a time schedule for creating backup images, such as “every Sunday at 11 PM.” I’d also love the ability to specify the size of the “split large files” option instead of just defaulting to 656 MB. Specifically, DVD-sized chunks would be great.
Of course, this is only one way to achieve the results for free. I am sure that there are other free imaging utilities, some of which may even integrate with BartPE or another live CD environment, but this is what I found that works for me. While another option would be to boot a Linux live CD and use a tool such as Mondo Rescue, using a Windows live CD simplifies matters in that I am guaranteed to have full NTFS write support.
Before any DOS purists attack me stating that Windows XP does indeed have a cloning utility called “xcopy”, let me say this. If you can prove to me that xcopy is as versatile and easy to use as DriveImage XML and can do everything that I’ve listed in this article, I’m all ears. Deciphering all those switches is not my cup of tea.
That said, I leave the door open for anyone to tell me an alternate way to create an image/restore backup system like the one I have described for free. We can all benefit from that kind of knowledge. Please do not tell me that “such-and-such program has a free 30-day trial.” That does not count.
Good luck, and happy backups.
—- Brian Bondari —-
© 2005