Ghost Windows for Free with Paragon Drive Backup Express (A Visual Guide)
April 1, 2009 - Reading time: 23 minutes
 Sometimes the healthiest thing you can do with your Windows installation is to just nuke it and start over from scratch. If you’ve ever done that before, you know just how long it takes to get all your files transferred, drivers and programs reloaded, and updates patched. The process can take hours, even days. While a true geek might actually enjoy the process a tiny bit, it’s much more satisfying to create a disk image of your pristine Windows install that you can revert to if it gets screwed up later.
I’ve written about this process a few times before, but today I would like to introduce Paragon Drive Backup Express. Essentially, Drive Backup Express (DBE) is the free version of Paragon’s commercial software. As expected, it lacks features compared to its commercial siblings, but is still quite usable. Hey, it’s hard to complain about free software.
Features
Let’s look at some features of Express (free) versus Personal Edition (commercial) as of 31 March 2009:
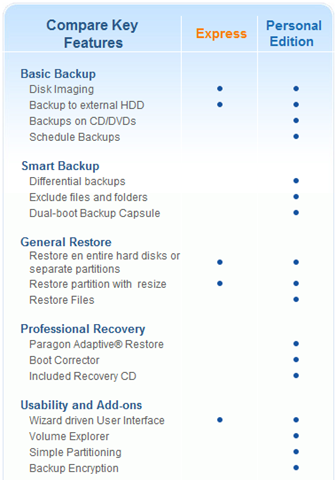
Don’t expect too much here – you won’t find any fancy features like scheduling, encryption, incremental backups, or image browsing. The Express version basically gives you the ability to make a backup of your disk/partition, plus the ability to restore it later. No more, no less.
Compared to the free version of Macrium, Reflect, the most glaring omission of DBE is the inability to back up straight to CD/DVD. If you can live with these restrictions (and most people can), DBE is a capable tool. Perhaps because it lacks all the fancy features, it’s also VERY easy to use.
Requirements
Drive Backup Express officially supports all versions of Windows from 2000 SP4 to Vista (32/64-bit). Sorry, no server operating systems are supported by the free edition. Supported file systems include:
- NTFS
- FAT16 and FAT32
- Linux EXT2, EXT3, and swap
- HPFS
Because DBE supports some Linux file systems, you should be able to back up and restore Linux partitions. I have not tested this capability yet.
Other requirements are minimal. At the least, you will need:
- A place to store the image after it is created – yes, DBE can store the disk image directly onto the C:\ drive as it is created, but you need another place to host the image if you plan to erase and restore the C:\ drive. Make sense? A few options include:
- a large USB flash drive might work (4 or 8+ GB)
- a blank DVD
- an external hard drive
- a spare internal disk or partition
Before we begin, PLEASE BACK UP YOUR CRITICAL DATA! It should be common sense that whenever you are working with disk imaging, you need to have backups of important data. Get a spare hard drive, burn everything to DVD, or look at some online storage (I highly recommend Dropbox).
The Process
Here’s an outline of the entire process:
- Install Drive Backup Express
- Configure Your System
- Create the Disk Image
- Verify the Disk Image
- Create the Rescue CD
- Restore the Disk Image
- Final Thoughts
1. Install Drive Backup Express
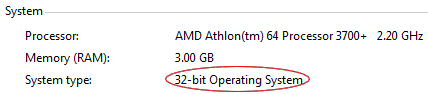
Here’s the DBE download page. There are separate downloads available for 32-bit versus 64-bit operating systems. Not sure whether your system is 32-bit or 64-bit? If it’s Windows 2000, it’s 32-bit. If it’s XP or Vista, hold down the Windows key and press Pause/Break. Look for the System information.
2. Configure Your System
This one is up to you – configure your system in a way that you would like to preserve. A freshly installed state is perfect, but if don’t feel like doing a complete re-install, here are a few suggestions:
- Get the latest security patches from Windows Update.
- Defragment your disk.
- Scan your system for malware.
- Clean out any unused or unnecessary applications.
I tend to create two disk images:
- A freshly installed system with only the latest drivers and security updates.
- A full image that also contains all my typical applications.
3. Create the Disk Image
Now it’s time to create our image. When you launch DBE, you will see a Welcome screen featuring a happy guy with an unbranded Macbook. Are we to assume that he just restored his BootCamp partition? Or maybe he’s happy that the Dow Jones Industrial Average actually went UP for a change? Anyway, I digress.
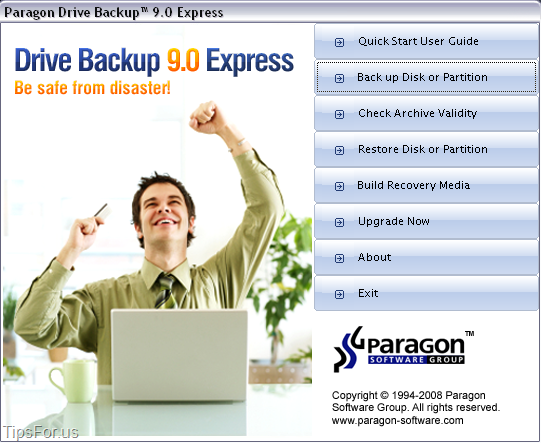
Click the Back up Disk or Partition option. The Simple Backup Wizard will appear.
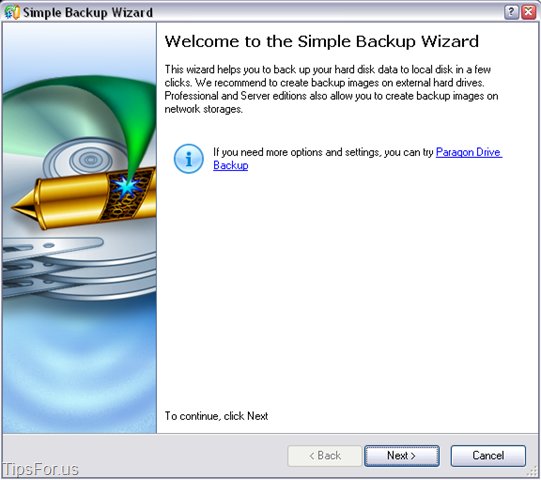
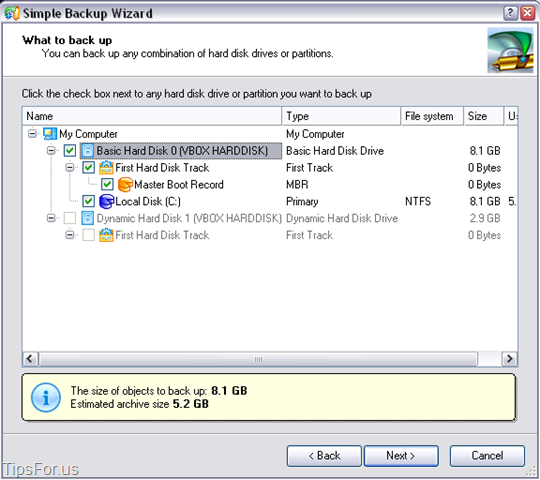
Follow the prompts to begin creating the image. First things first, select which disk or partition you would like to image. You may choose either a single partition or the entire hard disk, complete with the Master Boot Record (MBR). Unless you absolutely know what you are doing, go ahead and back up the partition table (called the Hard Disk Track) as well as the MBR. You will need them if you have to do a restore from bare metal.
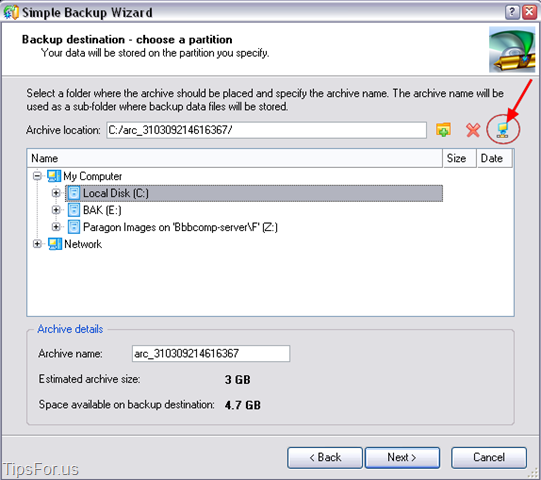
Next, choose a place to store the image. As mentioned before, you cannot burn the disk image directly to a CD or DVD, but you can store it directly on the currently running partition. In other words, if you are running from drive C:\, you can choose to store the image directly on the same drive. Drive Backup Express is smart enough to exclude the chosen storage directory and not create an infinite loop. However, you must move the image to a different location (DVD, flash drive, etc) BEFORE you can restore it since it is not possible to restore a disk from itself.
Store the image wherever you like, such as on the C:\ drive, a spare partition, or on an external disk. Note: you CAN also map a network drive and store the image directly on a networked computer. To do so, click the Network Drive button on the Backup Destination page.
Browse to find your networked computer and map a network drive to a shared folder. Enter the login information for the remote user. Note: that user must have read AND write privileges for the shared folder or DBE will not be able to store the image there. Also, though DBE can create your image over the network, I have not yet found an easy way to restore it over the network. Before you can restore it, you must transfer it to a DVD or some other external media.

Once you’ve chosen your destination, hit Next. DBE will immediately begin creating and storing your image. This process may take a while, so go have a coffee break.
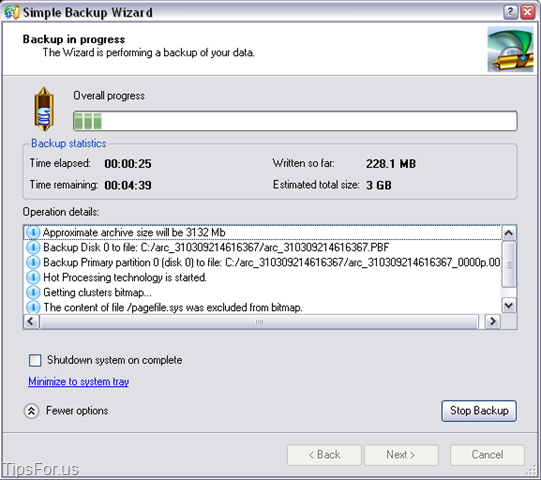
And it’s done! Hooray!
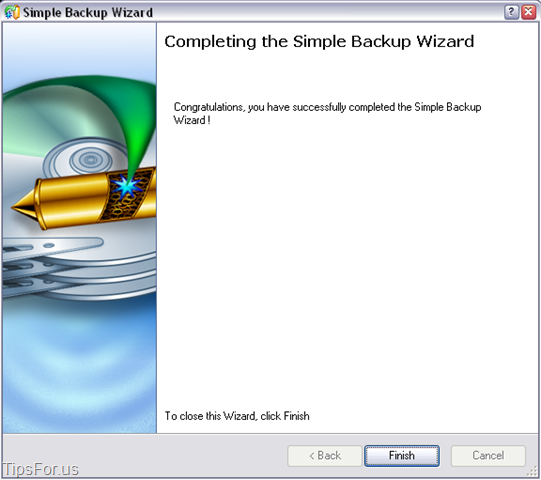
Now that your backup is complete, let’s talk about how to verify and restore it.
4. Verify the Disk Image
This step is optional, but I encourage you to do it anyway. You don’t want to find out the hard way that something is wrong with the image that you created.
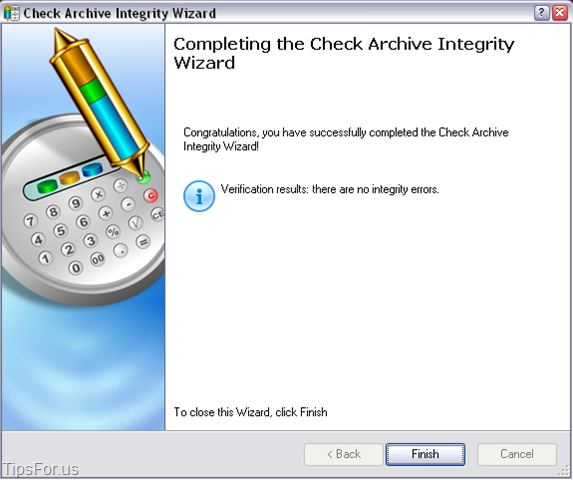
Back on the DBE Welcome screen, click the Check Archive Integrity button to launch a new wizard.

Browse to find the disk image that you created. DBE also keeps a list of archives that you have made, so you can just select it from the list.

Depending on the size of the archive, it may take several minutes to verify its integrity. Go refill that coffee.
If all goes well, the verification should complete without errors.
5. Create the Rescue CD
Before we can restore the image, we must create the Rescue environment. After all, if we’re going to erase and restore the current operating system, we can’t have that system running, can we?
Back on the DBE Welcome screen, click the Build Recovery Media option. The Recovery Media Builder will launch.
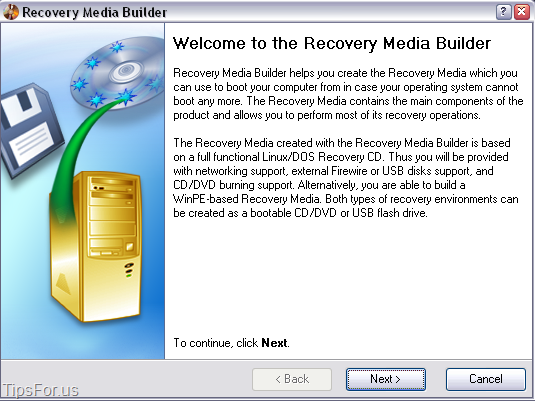
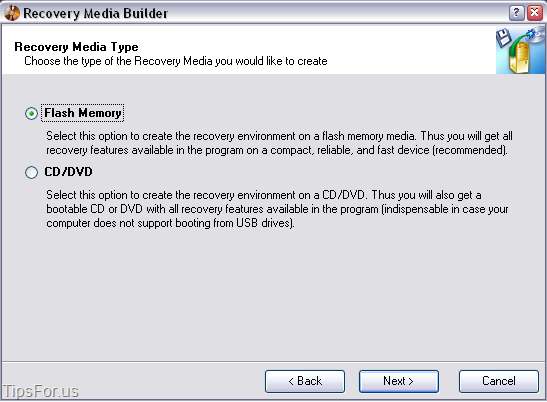
You have a choice: you can build the Rescue environment on either a CD/DVD or Flash Memory. If you know that your computer supports booting from a USB flash drive, this is a great choice. Otherwise, stick to the standard CD approach, which I will use for this tutorial.
Before you can build the recovery ISO, you have another choice: Typical settings, Advanced, or User-specified ISO.
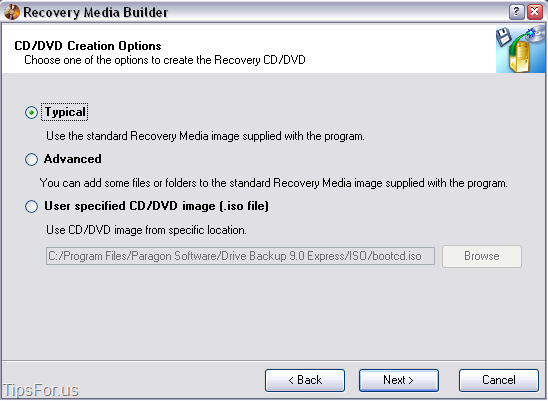
Typical – use this option if you just want to accept the default recovery package and start burning the disk. It will build a Linux-based boot disk with a minimal set of tools for restoring your image(s). If you’re unsure, go with this option.
Advanced – similar to the typical settings, but also gives you an option to add your own files or folders to the standard recovery image. For instance, if you have room on your DVD, you could add the folder where you stored the image itself. That way your recovery media also conveniently contains the disk image. Nice.
User-specified ISO – only choose this option if you already have another recovery ISO in mind to burn. Most users won’t have this.
Once you’ve made your choice, create your media. DBE can burn the disc for you directly, or you can choose the Emulator device option to build an ISO that you can burn later with a tool like InfraRecorder.
Now that your recovery media is ready, let’s move on to the restoration process. Please continue to the next page.
6. Restore Your Image
I’ve said it before, but it merits repeating. No backup solution is complete until you KNOW that you can successfully restore your disk images. Until you know that your backup works, it’s totally worthless.
Go ahead and reboot the computer with your recovery media inserted. If you’re booting from a USB flash drive, make sure your motherboard bios supports it. If booting from optical media, make sure your bios is set to first try booting from CD/DVD.
Here’s what the Linux-based recovery disc looks like upon boot:
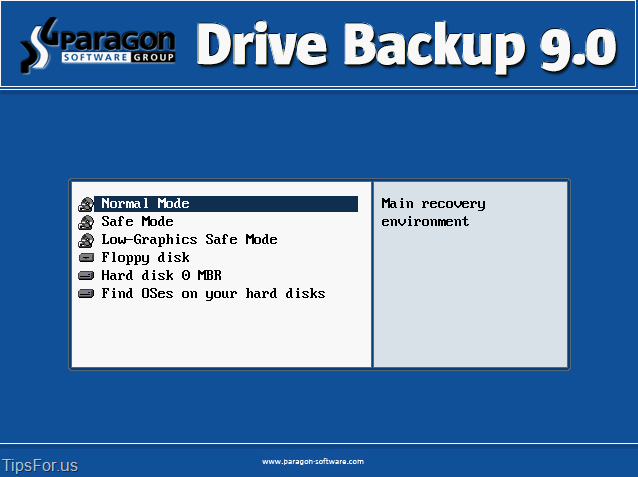
Most people should simply choose Normal Mode in the recovery environment. If it acts funny, try Safe Mode or Low-Graphics mode. The Normal Mode worked fine for me.
This brings us to the main screen of the recovery disk. We’re looking for the Simple Restore Wizard, but notice that a Backup Wizard is also included.
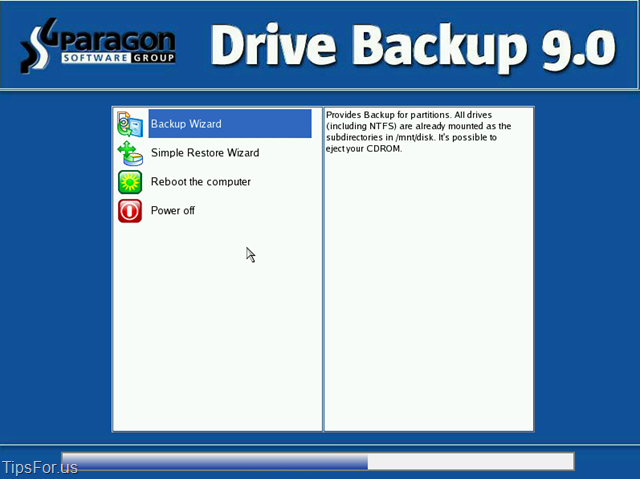
To me, this is one of the main strengths of DBE – you can actually create backups directly from the Rescue CD without actually having DBE installed on that computer. This is one advantage over a tool like Macrium Reflect.
Anyway, let’s continue restoring our image. Go ahead and double-click the Simple Restore Wizard. When it launches, click the browse button to find the image that you created.
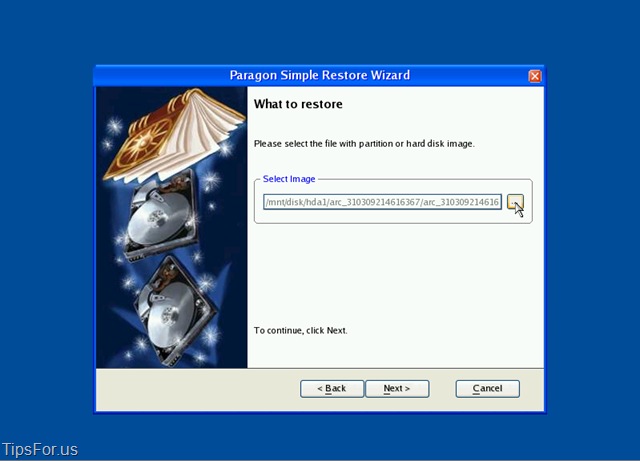
If you are running from a Rescue CD, then YES, you may eject the CD since it’s running in RAM. Networking support is not included, though, so as of now it is not possible to restore directly from a mapped Network Drive. If anyone figures this out, let me know.
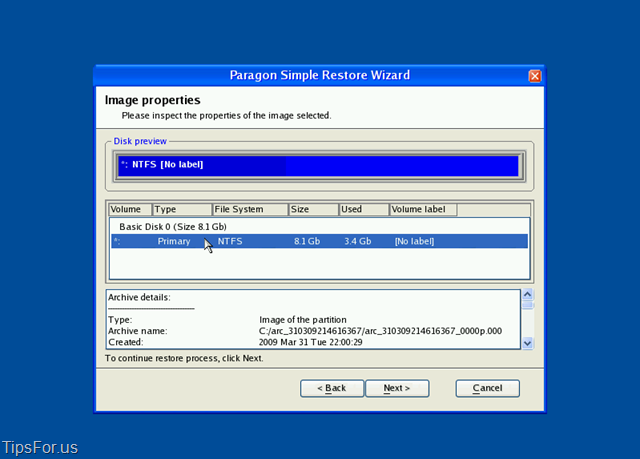
Continue with the Restore Wizard. The next screen will let you examine the properties of your selected image, including the size of the original partition and how much data is actually used. When you’re finished ogling at your image properties, click Next again.
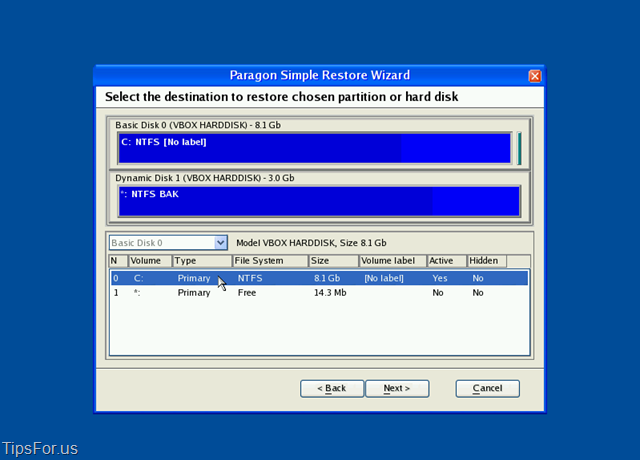
We’re almost done now. The last – but crucial – required step is to choose the disk that you want to restore. Make sure you choose the correct disk!

Note: if you stored your disk image on drive C:\, and you try to restore the image to drive C:\, what do you think will happen? That’s right – nothing! Nothing except an error message politely suggesting that you are an idiot, anyway.

The last page of the recovery wizard will give you an option to review all your proposed changes before it starts destroying data. Take a good, hard look at everything to make sure you’ve chosen the correct image and the appropriate hard disk. If all looks good, take a deep breath and hit Next to start the restore.
And we’re off! Sit back and watch helplessly as your disk is erased”¦ and (hopefully) restored with the working disk image data!
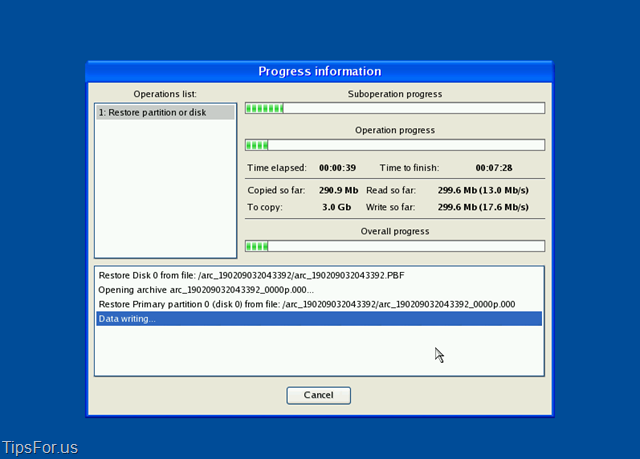
Again, this process may take a while depending on how much data is contained in your disk image, and depending on how wimpy your computer is. Take another coffee break or have a snack.
Hey, it looks like my restore is now complete.
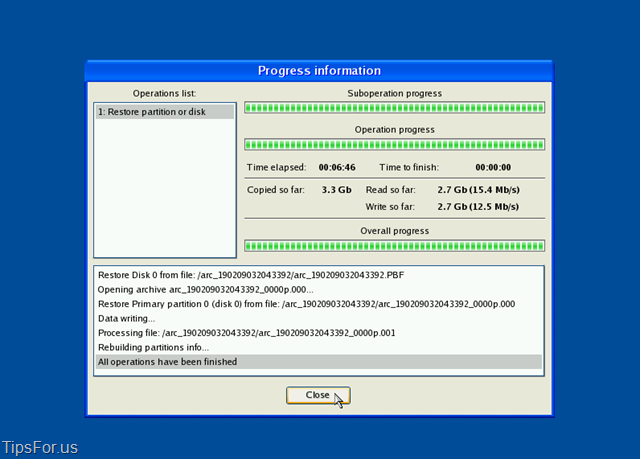
Exit the Simple Restore Wizard and reboot the computer. Don’t forget to remove your recovery boot disk! Provided everything went as planned, your system should now come back to life. Congratulations! If your hard disk melted, exploded, or consumed all the potato chips in your cabinet, I offer my condolences. Please re-read the instructions, and better luck next time. You DID back up your data, correct?
7. Final Thoughts
Paragon Drive Backup Express is a powerful tool provided you understand its limitations. Sure, it lacks the bells and whistles of its commercial siblings, but what it does offer is simplicity. I’ve tried several backup-restore disk imaging tools now, and DBE is one of the easiest, if not THE easiest to use. If all you want to do is create an image or two that you can restore later, DBE has you covered.
Of course, you might ask how DBE compares to the free version of Macrium Reflect. It’s a fair question. While they both can create and restore images without problem, there are a few little feature differences.
The main advantage of Macrium Reflect is that you can clone an image directly to CD/DVD. DBE lacks this capability in the free version, though you can always just store the image directly on a disk and burn to DVD afterward. Not a major setback, but it is an inconvenience in DBE.
The main advantage of DBE over Macrium Reflect is that you can create a disk image directly from the recovery media without installing anything. For purists who like a Windows installation to remain as uncluttered as possible, this is a major advantage. It’s a good idea to install the program anyway to make sure you have the latest version of the recovery media.
Other than those two differences, the programs are quite similar. Neither free editions support differential backups, encryption, or any other fancy features, but they both work well to just create and restore disk images. Pick whichever one you prefer. As an added bonus, both support Linux EXT file systems, so you should be able to clone Linux partitions from within Windows. Nice.
As always, good luck, and happy backups! May your images never get corrupt.
— Brian Bondari —