Share and Sync Your Music Library With MediaMonkey
March 20, 2009 - Reading time: 16 minutes
 Here’s the situation: my wife owns an iPod Nano. I own a Sandisk Fuze. We BOTH would like to access and share the SAME music library. Furthermore, we use different computers but don’t want to waste storage space by duplicating all the songs. In other words, I want to be able to rip a CD on MY computer and have it show up in HER music library (and vice versa). Is this possible?
YES.
Before we get started, here are a few issues to consider:
- This article focuses on MediaMonkey installed on Microsoft Windows. An iTunes-based article is forthcoming.
- In this setup, one PC acts as a server and one PC (or more) acts as a client. All the music files are stored on the host, naturally.
- Following this tutorial works best if you are setting up a new music library from scratch. Yes, you can share an existing music library, but I strongly suggest backing up your music files and database before you begin. I am not responsible for lost data.
- If you’re planning to share the same library with differing brands of portable music players, I suggest sticking to the MP3 format. Then again, you probably already knew that.
Why MediaMonkey?
It’s free. It’s easy to use. It plays most any file type. Best of all, it supports multiple types of MP3 players, including my wife’s iPod and my Sandisk Fuze.
Set Up The Host PC (Server)
As mentioned above, one computer should serve as the host for the music library files. The first thing we need to do is choose a place to store all the files. In my case, I’m using D:\Shared Music on the host computer. Adjust your path accordingly.
Network Shares
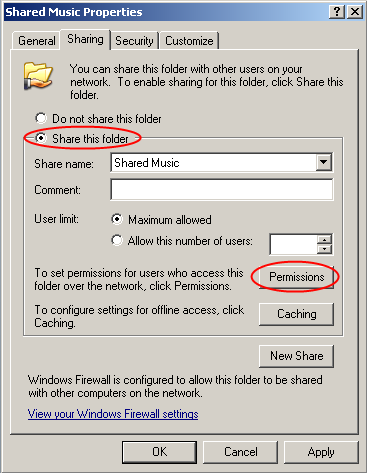
No matter what folder you choose, you need to set it as a network share with READ and WRITE privileges. Instructions will vary slightly depending on the specific operating system, but start by right-clicking the folder and looking for a Share option.
A quick note about User Accounts: unless you want to open up read/write permissions for everyone on the network (a bad idea), you should have a User Account for each client that will log into the shared folder over the network. For instance, I’m setting up my wife’s computer as the host, so I need to make sure that I’ve set up a username and password for myself on her computer. Make sense?
On XP Pro, click Share this folder, then hit the Permissions button. If you don’t feel like giving Everyone full control, click Add -> Advanced -> Find Now to bring up a list of potential Users. Find the User Account for the desired client and click OK twice. For that selected User, click the Full Control option.

On Vista/Server 2008, when the File Sharing window pops up, simply choose the desired client user from the drop-down list. Set the permissions to Co-owner to make sure they have full read/write privileges.
After you’ve set permissions accordingly, make sure you can connect to that network share from the client computer! Try adding and deleting a test file. If everything works, continue to the next section.
Hidden Folders and MediaMonkey Configuration
You can download the free version of MediaMonkey here. Once it’s installed, we need to make a few configuration changes. The files that we need to edit are hidden from the default operating system view, so before you continue, you must enable hidden files and folders.
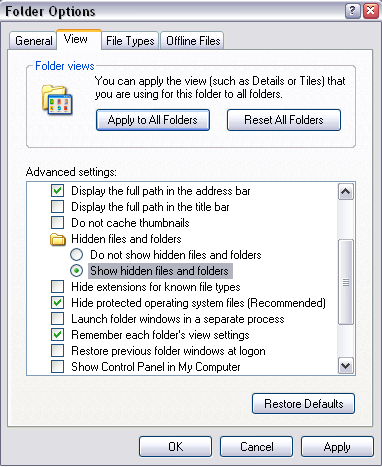
On Windows XP, open any Explorer folder (such as My Documents), go to the Tools menu -> Folder Options. Switch to the View tab, and click the button next to Show hidden files and folders.
On Vista/Server 2008, open any Explorer folder. Go to Organize -> Folder and Search Options. Switch to the View tab, and turn on Show hidden files and folders.
Here comes the fun part. In this next section, we’re going to move the MediaMonkey database and edit the main configuration file. Let’s go.
The MediaMonkey library database is contained in a file called MM.DB. That database, along with the *ini file containing the configuration settings, is in a hidden folder.
Depending on your OS, you can find the required files here:
- Windows XP – C:\Documents and Settings\USERNAME\Local Settings\Application Data\MediaMonkey
- Vista/Server 2008 – C:\Users\USERNAME\AppData\Local\MediaMonkey
Here’s what we need to do: we need to move the database to the shared folder that you created earlier. Then, we need to edit the configuration file to point MediaMonkey to the new database location.
BE SURE MEDIAMONKEY IS CLOSED BEFORE CONTINUING. Once MediaMonkey is fully shut down, move the database file (MM.DB) to the shared folder. Be sure to MOVE it, not just copy it. MediaMonkey will look in the default location first, so you do not want an existing database in the default location.
Next, open the MediaMonkey.ini configuration file in Notepad or another text editor. Find the section that starts with [System].
Somewhere in the section below [System], add a line with a parameter for the database name like this:
DBName=\\host-computer-name\shared-folder-path\MM.DB
In the above example, host-computer-name stands for the computer name of the host PC. If you are unsure what your computer name is, just right-click on My Computer and look for Computer Name. Provided your shared folder is shared properly, you should be able to access it by entering \\host-computer-name in the Address Bar of any Explorer window.
For example, my host computer’s name is sparkasse. and my shared folder is called Shared Music. My DBName line would look like this:
DBName=\\sparkasse\Shared Music\MM.DB
Make sense? For the record, I placed the DBName line just above the PlayerType parameter.
Note: I strongly suggest sticking to the UNC network name (\\computer-name or \\ip-address) instead of a drive letter since it avoids problems down the road and helps with unification of the path display within MediaMonkey. This is especially important when setting up the client PCs.
Dealing With Multiple Local Users
If several people have user accounts on the local computer, you can grant them all access to the shared music library by moving the location of the MediaMonkey.ini configuration file to the C:\Program Files\MediaMonkey\ folder. All local users will then share the same settings within MediaMonkey.
Otherwise, you should log into each user’s account and edit the configuration file in the default location as described above if you want them to share the same library.
Once you’ve added the DBName line, save the configuration file and re-launch MediaMonkey. If everything works normally, let’s move on to setting up a client.
Set Up The Client PC
Configuring a client to connect to the host PC is simpler. Here’s the process:
- Enable hidden folders
- Remove the local database
- Edit the MediaMonkey configuration file to point to the shared database
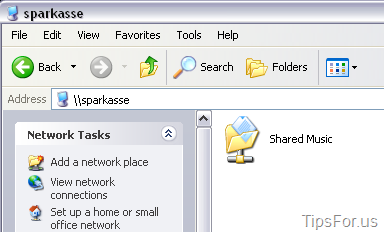
First things first, make sure you can access the host PC by typing its UNC network path into any Explorer window.
My Host PC name is sparkasse, so entering \\sparkasse works for me. Definitely check any Remember Password option that’s available.
Install MediaMoney on the client PC. Run it once to generate the hidden folder, but you don’t need to choose any folders to Add/Scan. Once it’s installed, enable hidden folders (as described above in Setting Up The Host PC). BE SURE TO SHUT DOWN MEDIAMONKEY.
Browse to the location of the hidden MediaMonkey folder:
- Windows XP – C:\Documents and Settings\USERNAME\Local Settings\Application Data\MediaMonkey
- Vista/Server 2008 – C:\Users\USERNAME\AppData\Local\MediaMonkey
Since this is a new install, you have no need for the MM.DB file (it’s empty anyway). Feel free to delete it. At the least, rename it. We don’t want MediaMonkey defaulting to the empty database.
Configuration File
Next, open up the MediaMonkey.ini configuration file. As with the host PC, add a line somewhere in the [System] section that reads:
DBName=\\host-computer-name\shared-folder-path\MM.DB
Once again, host-computer-name is the UNC path to the host PC. My example looks like this:
DBName=\\sparkasse\Shared Music\MM.DB
Save the configuration file and re-launch MediaMonkey. If you configured everything correctly, you should be able to browse and play songs stored on the host PC.
Other Issues
If everything went well up to this point, congratulations! You now have a shared music library that people can access simultaneously. This process worked fine for me. If it didn’t work for you, re-read the instructions and check for typos in your path and configuration file. The biggest potential problem that I’ve found is that the tracks in the shared library could be grayed out.
If you have an existing library with a mapped drive that you want to convert to UNC, see this thread.
CD Ripping

When ripping a CD (either on the Host or the Client), make sure that the Main Directory destination is set to the shared library via the UNC path (\\host-computer-name\shared-folder-path\).
See the screenshot for an example.
Yes, you can rip a CD while both computers are accessing the library. If the new files don’t show up immediately in the other user’s library, try collapsing and expanding the desired part of the Library tree, such as the Album or Location view.
At worst, close and re-launch MediaMonkey.
Access and Sharing
In the method that I’ve described, one computer (the host) stores all the music files, whereas the client(s) connect to the host over the network. Naturally, the host computer must be ON for this to work. If you have some kind of Network Attached Storage that you can access via a UNC name, this is not a problem.
Another issue is mobility. What if your host PC is an always-on desktop at home, but your client is a laptop or netbook? If that’s the case, accessing the host PC from outside your home network becomes a problem. However, this problem is solved by creating a VPN, or a way to access your LAN over the Internet. Look into LogMeIn Hamachi (free).
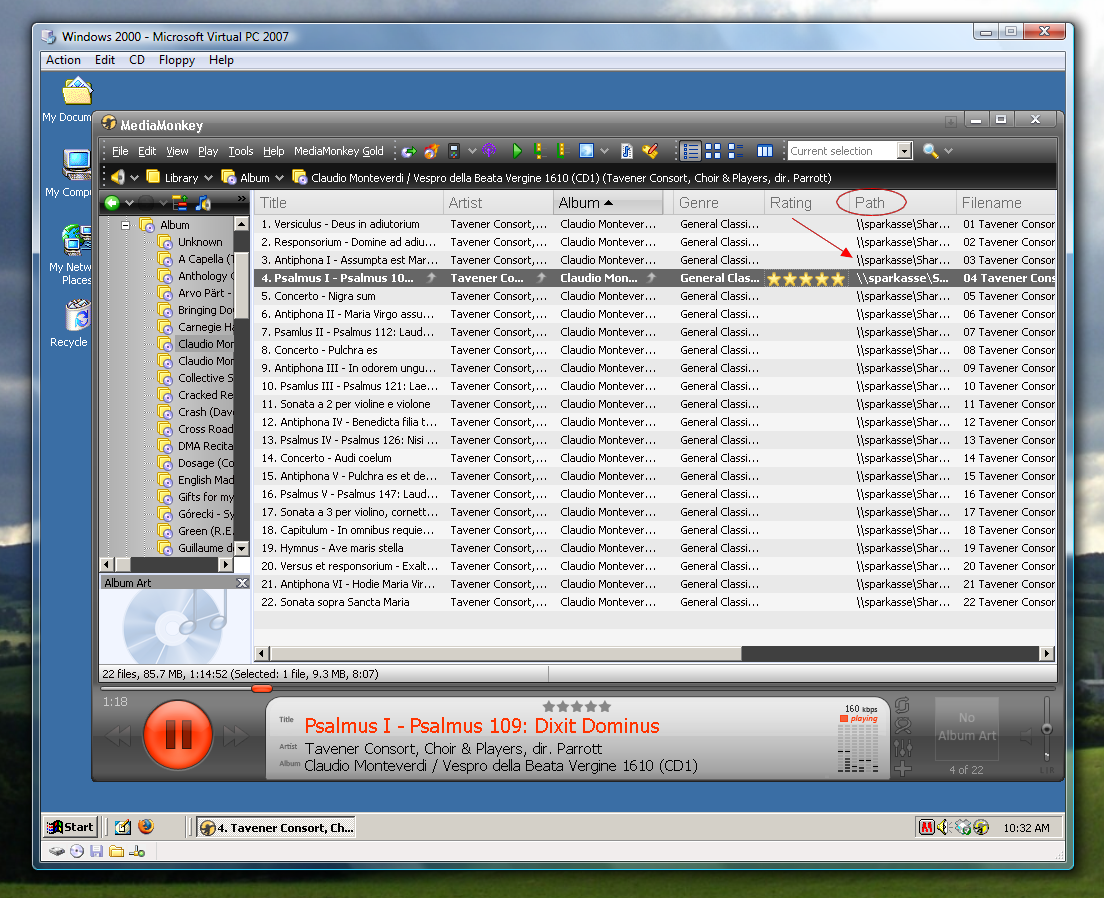
One caveat here is that I have not tried running more than three users simultaneously accessing the shared MediaMonkey library (one host, two clients). Everything that I’ve tried works without flaw, including ripping CDs on the host and client simultaneously. I’ve been running this setup for over a month now without a single problem, but I still suggest occasionally backing up your MM.DB file for safekeeping. Here’s a screenshot of MediaMonkey running (as a client) on Virtual PC on top of Server 2008. Notice the file path:
Overall, my wife and I are very happy with our new music setup. From different computers, we can both rip CDs, rate songs, and load our MP3 players from the same library.
If you have any suggestions to make or questions to ask, please comment below. I will do my best to answer them. Another great resource is the official MediaMonkey forum.
Good luck!
One last thing: this article took a long time to research and write. If you found it helpful, please help share it by giving it a Digg, a Stumble, Mixx, or whatever. 🙂
-- Brian Bondari