KeePass – Never Remember a Password Again
September 20, 2008 - Reading time: 8 minutes
 I have a confession – I can’t remember ANY of my passwords. In fact, I don’t even know my administrator login for this website! Then again, I don’t need to. The KeePass password manager handles all of it for me.
Accounts Galore
Before I begin extolling the virtues of KeePass, allow me to explain why I think a password manager is worthwhile. I can only speak for myself, but I have a ton of account information to remember. Back when the internet was young, I only had a Hotmail account (oh, and maybe a Geocities account, too). That’s it. Time marches on, and now I have login information for multiple e-mail accounts, a plethora of online storage services, several credit cards and bank accounts, and dozens of random internet services, such as eBay and Facebook.
Sure, I could use the same usernames and passwords for every site, but that’s a terrible idea. You’re literally putting all your eggs in one basket, and if your information is compromised, it could spell disaster for you across the Web.
Using different login information for each site is a much smarter idea, though it also means that you have to remember all of it! While I consider myself a competently-intelligent fellow, I welcome the assistance of a password manager in recalling all my various usernames, passwords, and security questions.
KeePass Rules
I started using KeePass about six months ago, and quite frankly, I’ve fallen headfirst in love with it. First of all, KeePass is completely open-source and FREE. It’s easy to use. It’s secure. It’s portable. Best of all, you can use it interchangeably on Windows, Mac OS X, and Linux. Heck, you can even use it on your Blackberry or Windows Mobile device!
Since I started using KeePass, I’ve changed the way I approach account creation. No longer do I have to think of a new username and password (and then figure out a way to remember it!), nor do I feel that little twinge of guilt as I recycle login information for yet another site! I’ve come to appreciate the power, versatility, and convenience KeePass has given me.
Convinced yet? Let’s talk about basic setup and usage.
Setting up KeePass
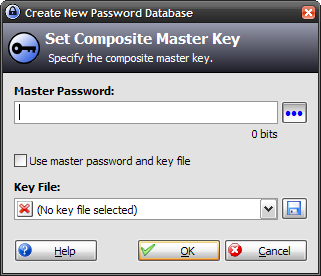
To begin using KeePass, you first need to create a new database in which to store your entries. From the File menu, choose New…. A window will spawn, prompting you to create a master password.
The master password is the only password you absolutely MUST remember. Without it, you will not be able to access any of your other passwords. It is truly one password to rule them all, and in the database BIND THEM! Create as strong a password as you can remember.
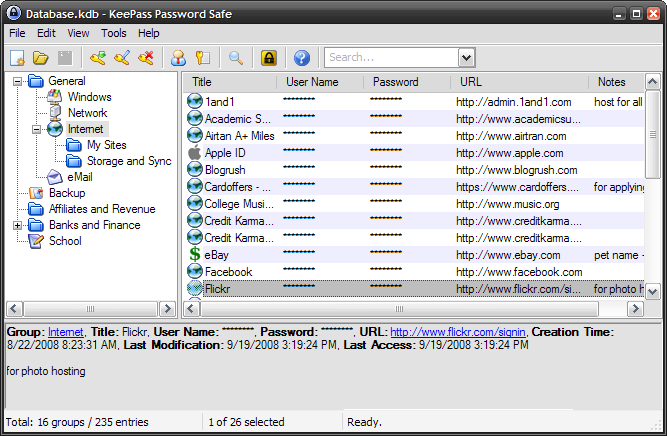
Once your master password is set, let’s add some individual entries. The main interface of KeePass separates passwords Groups on the left and Entries on the right. Here’s what it looks like on my computer:
To add an entry, go the the Edit menu and choose Add Entry (or just press Crtl + Y). A new window will spawn like this one shown here:
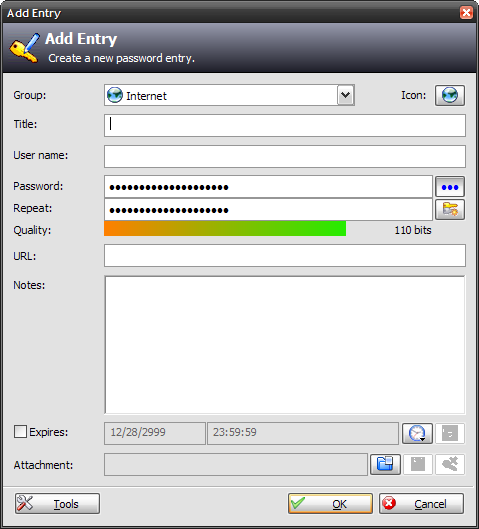
Fill in the necessary information, including the password (press Shift + Home to clear the password field), and then press OK when done. Be sure to add a URL if appropriate. Also note the attachment option near the bottom. If a web site has security questions (most banks do this), I often take a quick screenshot of the questions and answers, then attach the picture to the KeePass entry.
Congratulations, you now have a new entry. But what can we DO with it? Now we’re getting to the good part.
Using KeePass
The sheer amount of features that KeePass offers makes it infinitesimally cooler than typing all your passwords into a text document. Let’s try a few:
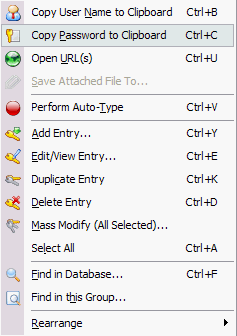
Right-click on that entry you just created and feast your eyes on the options. With a simple keystroke, you can open the URL that you provided. Don’t feel like typing the password when logging into an online banking session? No problem. With another keystroke, KeePass will temporarily copy your password to the clipboard, allowing you to paste it into the appropriate web site. Worried that someone will come along behind you and try to paste again to discover your password? Have no fear, KeePass securely shreds that information seconds after the first paste. Cool!
Don’t like keystrokes? No problem! KeePass features excellent drag-and-drop support. From the main interface, you can simply click-and-drag the username and password fields to the appropriate place on the website, and KeePass will fill them in appropriately!
Here’s a little flash video that I made to demonstrate the dragging and dropping capabilities:
Screencast – Dragging in KeePass
In that video, you can see me dragging the username and password field to gain access to myBloop. Slick, huh?
The drag-and-drop options (plus the keystroke ability) provide added security against keyloggers. I spent several weeks in Europe this past summer, and I have an inherent distrust of public Internet cafes. Who knows if someone has surreptitiously installed some software to record every keystroke pressed on the keyboard? Perhaps I’m paranoid, but I solved the problem by running KeePass from a USB flash drive at all Internet cafes, leaving no trace behind me.
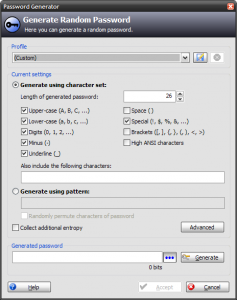
Another cool feature of KeePass is the password generator. I use it for almost all new accounts, but especially with certain sites that I do not trust very much (such as eBay).
When I say that I don’t know my current passwords, I mean it! Almost all of them are generated. Don’t worry, you can always use the reveal option in KeePass to see the actual password.
Storing the Database
Since the database KeePass uses to store your account information is completely encrypted, you can simply e-mail the file to yourself for safekeeping. I keep the database stored on my personal computer, plus in a couple different places online. Tip: I keep my database in my Dropbox folder, meaning that it automatically syncs between my computers every time I make an update. Read more about Dropbox here and here.
A bomb could fall on my house while I’m away and I would still have all my critical account information!
For added security, you could always stuff the database into a password-encrypted archive (using something like 7-zip or IZArc) before storing it online.
Good luck, and may you soon forget all your passwords!
Find this article useful? Subscribe to our RSS feed to receive future updates!
