“Ghost” Your Windows System for Free Using Open-Source Tools
June 5, 2007 - Reading time: 20 minutes
The following tutorial is intended for those with some knowledge of Linux and the command line. At the least, you should be comfortable with creating and navigating directories, and should possess a fundamental knowledge of hardware device names under Linux.
Sound scary? A “point-and-click” guide to accomplishing most of the same tasks is also available.
The Problem
Like it or not, Windows needs to be reinstalled occasionally. Whether the cause is a bloated registry, a virus/spyware attack, or an idiotic user, with time Windows just seems to slow down and/or behave erratically.
Re-installing Windows from scratch is a pain. Once you get the base system installed, most people have to download millions of updates and patches, scour the web in search of the latest drivers, and reboot, reboot, reboot.
The Solution
Once you get your Windows system installed and configured the way YOU want it, you should be able to restore to that pristine state in a matter of minutes, not hours. The way to do this is to create an “image” of your freshly-installed system, from which you can later restore when necessary. Of course, there are a number of commercial packages available to do this task, but what if you do not want to spend any money?
Linux and open-source software to the rescue. Yes, you can quickly, and (dare I say) easily image and restore a Windows system using open-source tools. Before we begin, please back up any critical data. This procedure worked for me, but I am not responsible for any data loss.
The Main Tools
Repeat after me: “I am NOT afraid of the Command Line!”
The open-source tools that we are going to use are:
- ntfs-3g – a driver for NTFS
- GParted – a partition editor
- ntfsclone – exactly what it sounds like
- a Linux “live” CD
In order to restore Windows, you need to run from a different working environment, such as a Linux “live” CD. Any Linux “live” CD with the above tools will work, but two available options are SystemRescueCD and Puppy Linux. Both allow you to boot and run entirely in RAM, freeing your CD/DVD burner for any additional tasks that you might need. I successfully completed all of the tasks detailed below using both Puppy and SystemRescueCD. Just grab the latest version of whichever you prefer.![]()
Note: If you use SystemRescueCD, I recommend typing docache doeject at the boot prompt. These two options will load the entire rescue environment into RAM and then eject the CD afterwards. Puppy Linux, on the other hand, loads into RAM by default. The rest of this tutorial will use Puppy Linux, though the commands can easily be issued from any live CD that contains the above tools.
Before you can image and restore your system, you need to consider a few things:
- ntfsclone cannot (yet) easily restore an image to a partition smaller than the size of the original partition. Thus, if you clone a 120 GB partition with only 20 GB used, you must restore to a partition size of at least 120 GB. There is a fairly-easy way around this. Keep reading.
- Where are you going to store your newly-created image? I recommend storing it on a separate partition or on a separate server (using SSH). I will walk you through both of these methods.
- Gloriously, the ntfs-3g driver provides full NTFS read/write support! I did not encounter any problems manipulating NTFS on either Windows 2000 or XP. This procedure should work for Vista, but since I do not own it, so I cannot test it.
The entire process in a nutshell:
- Boot into the “live” CD.
- Make room for a new partition (recommended, but optional).
- Make directories and mount (not applicable for SSH).
- Create the image.
- Restore the image.
- Using SSH (optional)
- Conclusion / Advanced Restoration.
Booting
Loading Puppy:
Burn the ISO as an “image” and boot from the CD. You will then have to navigate options for language, X.org, and screen resolution. Most people can just push Enter three times, resulting in a 1024×768 setup, which is perfectly sufficient. You may then eject the CD if you desire. Booting Puppy Linux on my system took only about two minutes.
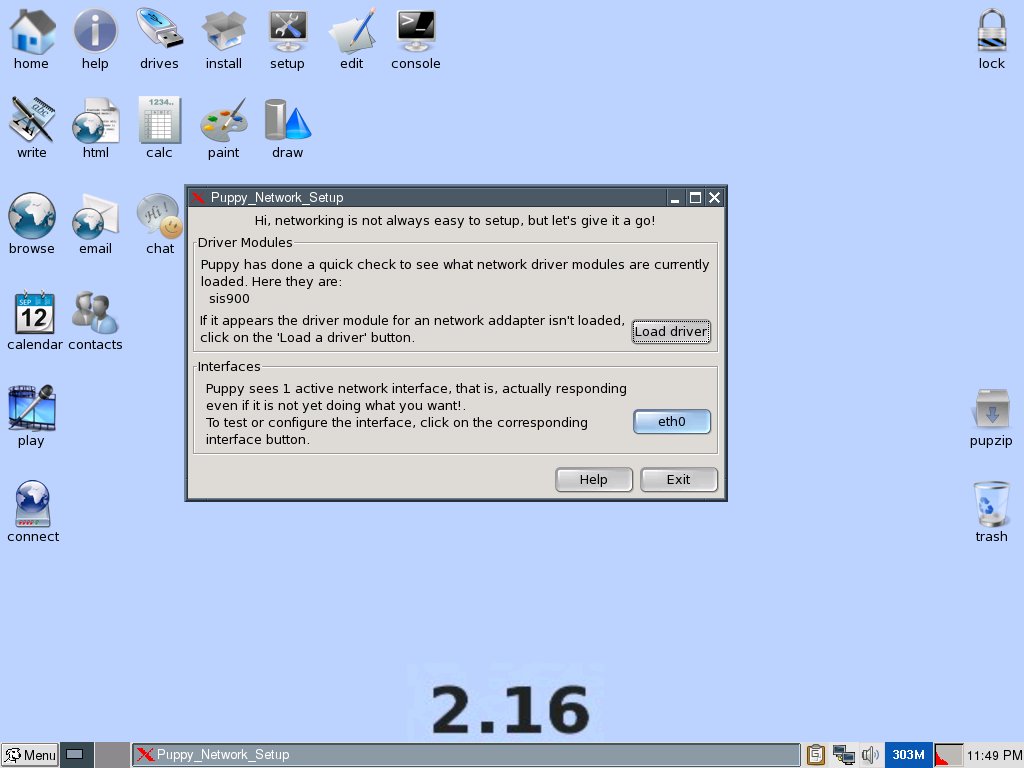
If you would like network access (required if you want to use SSH), click on the Connect icon. Puppy should (hopefully) find your network module. Select your network card (eth0 in most cases), and configure with Auto DHCP (most cases). If you have a static IP address, you will need to enter that information manually. Once configured, you should have a networking icon in the system tray (see screenshot).
Make Room for the New Partition
If you don’t care about the size of the original partition and just want to store your system image directly on another server with SSH, you may safely skip this section.
Now that you are running from CD, let’s make room for the system image. As I mentioned previously, ntfsclone cannot easily restore an image to a smaller partition than the original. One solution here is to resize your original partition before you create the image. For instance, if you have a 200 GB drive with only 25 GB used, shrink your partition to something more manageable (maybe 40 – 50 GB), and allocate the remaining portion as a separate partition for storage.
Of course, I cannot cover every possible partition scheme, but I assume that many readers of this article have their entire hard disk dedicated to Windows, formatted as NTFS. In that case, I suggest shrinking that partition down to a manageable size, and designating the remainder as a separate NTFS partition.
Resizing a partition is easy, and can be done completely with a graphical interface using GParted. To launch it, go to the Puppy menu, then System, and then choose GParted. Once GParted has opened, select the Windows partition and click Resize/Move. Drag the right side of the original partition to the left, thus shrinking it to your designated size. In the unallocated space, create a new partition and format it using the filesystem of your choice. Note: if you suspect that your system image will be quite large, I do NOT recommend FAT32, since it has a 4 GB file size limit. Yes, you can split the image into 4 GB chunks, but this increases the complexity. If you just plan to use Windows on your machine, NTFS is a fine choice.
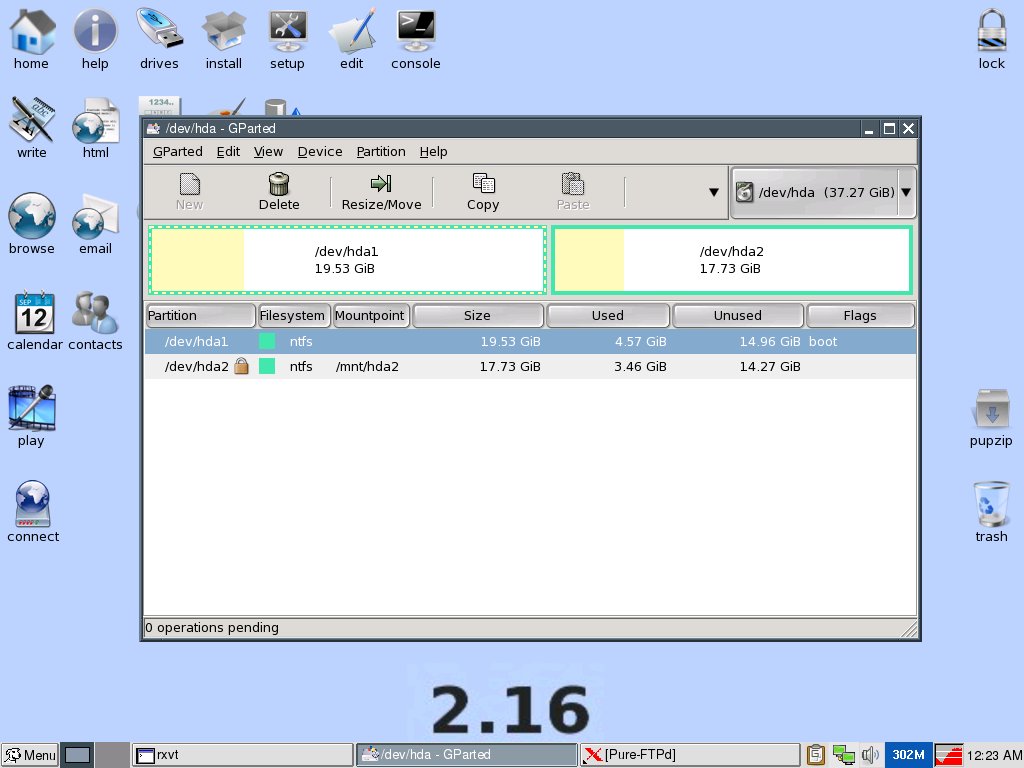
In my case, I resized a 40 GB drive with one NTFS partition into two NTFS partitions, ending up with something like this (see screenshot).
Once you have resized and created your partition scheme, click Apply, and let GParted go to work. Depending on the size of your disk and the speed of your processor, this task may take an hour or more. Go make a cup of coffee or something.
If you want to verify that Windows still works when GParted is finished, feel free to reboot afterward. Windows will scan the disk for errors, but should come alive when finished. If all is well, breathe a sigh of relief and boot your Linux live CD again.
Make Directories and Mount
Once again, if you just want to store your system image directly on another server with SSH, you may safely skip this section.
Now we need to mount the newly-created partition. First, we need to specify the folder where it will be mounted. GParted should tell you the name of the spare partition that you just created. If it is the second partition on the first hard drive, the name is likely hda2. If you are using a SATA hard disk, the spare partition is probably named sda2. Whichever it is, remember it, and adjust it accordingly in the steps below. DO NOT MOUNT THE PARTITION THAT CONTAINS WINDOWS.
Using a Terminal, create a directory inside /mnt where you will mount the spare partition. I will use hda2 as the directory name.
# mkdir /mnt/hda2
Assuming your spare partition is formatted as NTFS, let’s mount it using the ntfs-3g driver.
# ntfs-3g /dev/hda2 /mnt/hda2
The above command tells the system, “Using ntfs-3g, mount the second partition of the first hard drive into the folder /mnt/hda2.” Adjust your commands as needed.
Still with me? Good! Now we get to the fun part: Creating our image.
Create the System Image
If you made it this far, congratulations. Most of the hard work is behind you. All that is left now is understanding how the ntfsclone tool works. ntfsclone does exactly what it sounds like: it clones the data on an NTFS partition. Unlike a tool such as the venerable dd command, ntfsclone only copies the used data on a partition, whereas dd copies every sector bit by bit. The result is that ntfsclone will create a much smaller image than dd.
Image compression is handled by an independent tool, such as gzip or bzip2. Unless you are absolutely pressed for space, I recommend using gzip for compression as it will work much faster. The beauty of Linux is that we can easily chain these commands together. Here we go.
Image creation, compression, and saving to the spare partition can all be accomplished in one fell swoop. Assuming that the Windows partition is /dev/hda1, and /mnt/hda2 is our previously-designated save location, here is an example:
# ntfsclone -s -o – /dev/hda1 | gzip -c > /mnt/hda2/name-of-image.img.gz
Here is the anatomy of the above command:
- (-s) essentially means “save to an image”
- (-o) means “output to a file”
- (-) means “clone to the standard ouput,” which is then passed to gzip
through a pipe (the vertical character “|”) - (-c) an option passed to gzip telling it to keep the incoming file unchanged
- (>) sends all of the incoming information to the path and file that you
specify
That’s it. Let ntfsclone work its magic. Depending on the size of your Windows image, the process may take anywhere from a few minutes to a half hour or more. For me, imaging a roughly 6 GB Windows installation took about 12 minutes.
Note: for maximal gzip compression, pass the -9 option to gzip in the above command (… gzip -c -9…). This will take a little longer, but should result in a slightly smaller image.
Restore the System Image
No backup solution is complete without verifying that the restoration process works. To restore the image that you created, simply reverse the tasks. First we need to “unzip” the compressed archive, then use ntfsclone to restore the data.
Can we do all of this in one command? Of course! Here is an example:
# gunzip -c /mnt/hda2/name-of-image.img.gz | ntfsclone -r -O /dev/hda1 –
The above command un-archives the image that you created and passes the data directly to ntfsclone, which then restores (-r) and overwrites (-O) the data on hda1. Don’t forget the trailing hyphen (-) in the above command.
I found that restoring the image took significantly less time than creating it. Easy as pie, huh? Reboot, and as long as the Master Boot Record (MBR) and partition table are undamaged, Windows should come to life.
Remote Storage Over SSH
If you have access to a remote server over SSH (if you do not know what this means, then you don’t have it), you can send your Windows image directly to the remote server during the creation process. There is no need to mount any partitions when you boot the Linux live CD. Please test your SSH connection before you proceed.
Assuming that Windows is installed on the first partition of the first hard disk, this is an example command:
# ntfsclone -s -o – /dev/hda1 | gzip -c | ssh username@server ‘cat > name-of-image.img.gz’
Notice the two “pipes” in the above command? We use ntfsclone to clone hda1, pass the data directly to gzip for compression, then pass the compressed data directly to the remote server, writing it to the name of the file that you specify. Neat, huh?
To restore the image from the remote server, simply reverse the procedures. First we will SSH into the server to retrieve the image, unzip it, and pass the resulting data to ntfsclone, all in one fell swoop.
# ssh username@server ‘cat name-of-image.img.gz’ | gunzip -c | ntfsclone -r -O /dev/hda1 –
Once again, don’t forget the trailing hyphen (-) at the end of the above command.
A note about SSH passwords: unless you are using SSH keys, the above commands will hang right after you issue them, as they will be waiting for your SSH password. Type your password, press Enter, and they should proceed as normal.
Benefits of Remote Backup?
I tested the SSH method in two ways:
- I set up my Macbook in the living room and sent the image from my office computer over wireless. The backup time was about as fast as sending the image to a spare partition.
- I have about 250 GB available on my 1and1 hosting plan. Since SSH is enabled, I can send the image directly to my web server.
While storing the Windows image on a spare partition may be handy, I highly recommend that you archive it elsewhere. What if your hard disk explodes, or a cat urinates on your motherboard? Hey, it could happen. Storing the image elsewhere, such as on a DVD (if it fits), on another computer in your home, or on an off-site server is handy.
While storing my Windows image on my web server sounds appealing, I am not sure that I am comfortable with the idea, unless I made that folder inaccessible to the public. Anyway, here is how you could restore directly from your web server. Use a tool like wget to grab the image, then send the data to ntfsclone.
wget -qO – https://yourserver/path/name-of-image.img.gz | ntfsclone -r -O /dev/hda1 –
Conclusions / Advanced Restoration
As you can see, a Linux “live” CD truly possesses great power. By simply chaining a few commands together, it is possible to do amazing things. Though this process is not as simple as “point and click,” it is absolutely free, extremely flexible, and requires nothing to install.
One issue that I did not cover at all is a “bare metal” restore, meaning a restoration to a completely-erased (or new) hard disk. This is possible by simply using GParted in conjunction with a few more commands. If you are interested in doing this (and you should be), you need to archive the Master Boot Record (MBR) as well as the partition table. We do this by using the aforementioned dd tool.
Saving the MBR plus primary partition table:
# dd if=/dev/hda bs=512 count=1 of=/mnt/hda2/master-hda.mbr
If you need to restore it, just reverse it:
# dd if=/mnt/hda2/master-hda.mbr of=/dev/hda
Of course, if you are restoring to a completely blank drive, you MUST have the image and the MBR file archived elsewhere, such as on a DVD or a remote server, so you will probably need to alter the restoration path of the MBR file accordingly. Once dd sets the partition table and MBR in order, you may then use GParted to format or alter any additional partitions and restore with ntfsclone as usual.
Restoring from “bare metal” is a complicated issue, but hopefully that gets you on the right track. Perhaps I will create an addendum for this article sometime soon.
If you read all the way to the end of this tutorial, here is your reward. I created a one-page cheatsheet containing all of the relevant commands. Feel free to print it and use it for your reference. 🙂
Good luck, and as always, happy backups!
— Brian Bondari
June 2007