Avoiding Noisy Recording: Tips for BEFORE you Record
April 12, 2008 - Reading time: 5 minutes
Have you ever ended up with a horrible recording of a concert or wedding and wondered how it could sound so bad? How do you possibly clean up all that hiss and rumble? Well, most of us have been there… but I’ve also been in million dollar recording studios and worked with some pretty tight software, so hopefully I can help shed some light on this elusive topic.
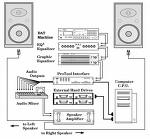
Signal Path
The route that sound takes to get from its source to the recording device can drastically affect its sound. A weak link destroys the end result. It’s like fresh food: the freshest, most succulent, vine-ripened organic tomato tastes like crap if it fell into a pit toilet before ending up on your porcelain dinner plate. Here are the main stops in a signal’s path:
-
The sound source (the thing you are recording)
-
…the air between…
-
The microphone (and the pre-amp)
-
The cable(s)
-
The Recording Device (e.g. your video camera)
You can and should try to adjust *every* element in your signal path to get the best possible sound BEFORE YOU RECORD. You can only do so much afterwards.
Mic Placement: Controlling the Air Between
Even an inch can make all the difference (no penis jokes please). Try to get the mic close to the sound source, and take the time to test different angles/positions. If you have ever mic’ed up a drum kit, you know what I’m talking about.
If you are recording with a camera, please remember that the location for the best shot is usually NOT the best location for the best sound recording. That’s why those cameras with an external mic input are golden.
The Microphone Itself
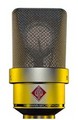
You get what you pay for when it comes to mics. Built-in mics on a camera are generally low-quality. Radio Shack’s $10 cassette mic won’t sound as good as a $3,000 Neumann. Consider the following suggestions:
- Avoid omni-directional mics if you can — they tend to be far noisier than their cardiod counterparts. They may have “better sonic clarity”, but they pick up all kinds of room noise, which is usually NOT what you want. More about pickup patterns…
- Condenser microphones are generally much better mics and much more sensitive. More about types of mics…
- Use a good pre-amp to ensure your mic gets the power it needs. The pre-amp built into your camera isn’t very good. You can find reasonable portable camera preamps. The Beachtek DXA-10 is no longer available, but there are things out there like it.
The best piece of advice I can give here is to TRY a few different kinds of microphones. Buy a couple, knowing that you will return one. If your ear can’t tell the difference, ask a friend. For recording a human voice, I recommend the Neumann 103, or if you’re on a budget, the Rode NT1-A.
Cables
These matter a lot, surprisingly. There’s a bigger difference in sound quality between good and bad cables than there is between good and bad mics. Wow. Read that again. I am not kidding. Again, tease your credit card and buy a couple good cables and listen to how they sound — if you don’t think they make a big difference, you can send them back. I unabashedly recommend MIT microphone cables. But they ain’t cheap. Monster cable also has a high-end line that’s much more affordable. The point is to avoid the cheap-ass cables because they will muddy up your sound.
The Recording Device
Make it the best possible. If you are recording to your computer, you’d better have a good audio interface. The little 1/8 inch input on your SoundBlaster does not qualify as “good.” DV tapes on cameras are good, but set it to use the highest bit rate possible (often there is a 12 bit and a 16 bit setting).
Spend some time with these ideas and your recordings will improve. Look for a future post about software to help you improve the sound of existing recordings.
-- Everett Griffiths