Sync Your Windows Mobile Contacts and Calendar with Plaxo, Thunderbird, and Google for FREE
April 19, 2008 - Reading time: 20 minutes
A few days ago I wrote about syncing your Windows Mobile contacts and calendar over the Internet for free using Funambol. Today I’m going to show you how to accomplish the same task, plus the ability to synchronize your contacts and calendar with Plaxo, Mozilla Thunderbird, and Google Calendar.
Excited yet? Let me show you how neat this truly is – how would you like the ability to add an event to Google Calendar and have it automatically update on Thunderbird AND your Windows Mobile device (Smartphone or PocketPC)? Sound good? How about adding a new Contact on your phone and having it show up in Thunderbird (or vice versa)? What if I tell you that you don’t even need to install anything on your phone? Oh, and here’s the best part – the entire process is FREE.
Required Tools
Several pieces of software work in conjunction to keep everything in sync. Here’s what you will need:
On the Internet:
- a Google Calendar account (if you’re reading this, you probably have one already)
- a Plaxo account
For Your Windows Mobile Device:
- A NuevaSync account
- Currently in Beta
For Your Computer (Windows, Mac OS X, Linux/BSD):
- Mozilla Thunderbird
- Plaxo add-on for Thunderbird
- Lightning add-on for Thunderbird
- Provider add-on for Thunderbird
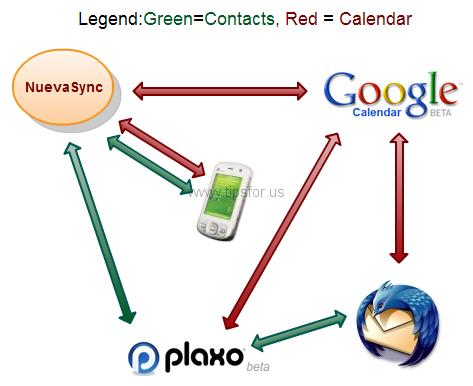
Sound complicated? It really is not. Here’s a visual guide that I threw together to illustrate the data directions.
Before we begin, let me state that all of these products are currently free. While I hope they all stay that way, I have not yet discovered whether or not NuevaSync will begin charging for their service once they come out of Beta. If anyone associated with NuevaSync reads this, we would appreciate a comment. Also, Plaxo has a free and a Premium service. For the purposes of this guide, the free service is all you need.
Also, please note that some of these services are in Beta, meaning that there may be bugs and/or outages. PLEASE BACK UP YOUR MOBILE DATA BEFORE YOU PROCEED! This guide may work flawlessly for you, or it may eat all the noodles in your pantry. Proceed with caution. I am not responsible for any lost data.
Step One – Web Services
1. First things first, if you want to sync with Google Calendar, you must HAVE a Google Calendar. If you have a Gmail account, you already have one.
![]() 2. Next, create an account with Plaxo. Yes, Plaxo is yet another social network, though without the I’m an attention whore kind of mentality most social networks have. Instead, Plaxo focuses on keeping information about you and your contacts up-to-date. Here’s the last few lines from their About Page:
2. Next, create an account with Plaxo. Yes, Plaxo is yet another social network, though without the I’m an attention whore kind of mentality most social networks have. Instead, Plaxo focuses on keeping information about you and your contacts up-to-date. Here’s the last few lines from their About Page:
We are dedicated to the notion that your address book, your friends list, and your content belong to you, not to us. We make it easy for you to take them with you wherever you go and to use them with an ever-expanding array of sites, applications, and devices.
I can’t stand most social networks, but I can handle Plaxo simply because they are an integral tool in keeping my sync setup working.
3. Add a Google sync point to Plaxo.
Before you sign out of Plaxo, we need to add a sync point for Google. Essentially, you are going to give Plaxo your Google Account information and have Plaxo log in and perform a Calendar sync every 15 minutes.
Click the Calendar tab at the top of Plaxo.

At the bottom of the page, look for the Add sync points link.

Choose the Google option, enter your account information, and follow the prompts. Plaxo can currently only sync your Google Contacts in one direction (from Google to Plaxo), but syncing with Google Calendar is bi-directional.
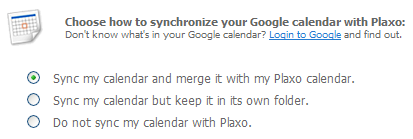
Once this step is complete, your Google and Plaxo calendars should be synchronized. Now you can move on to the Windows Mobile device setup.
Step Two – Windows Mobile Device
We’re going to use NuevaSync to connect your Smartphone/PocketPC to both Google Calendar and Plaxo. There are two main steps to this process.
1. First, create an account with NuevaSync, a service that provides over-the-air synchronization of Smartphones and PocketPCs. Their website is pretty sparse, but essentially NuevaSync acts like an Exchange Server, using the built-in ActiveSync (OTA) protocol on your Windows Mobile device. Think of it as a proxy to Google Calendar and Plaxo.
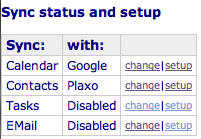
Once you’ve created your account, all you need to do is tell it sync your Calendar and Contacts with the appropriate services. You will see a status and setup screen like the one shown here. Use the change button to choose the Google and Plaxo services, and use the setup button for each to provide the appropriate login information for each service. (Note: if you are uncomfortable providing your Google and Plaxo login information to NuevaSync, you will be unable to proceed any further. I admit that it was a little disconcerting, but I have seen no consequences to date. If either account is ever hijacked, I will post back here.)
2. Configure your Windows Mobile device to connect to NuevaSync.
Guess what? You don’t have to install anything on your Windows Mobile device from NuevaSync. All you need is ActiveSync, which is already built-in. Here’s the process:
- Launch ActiveSync (Programs -> ActiveSync).
- If you have an existing server setup, delete it (Menu -> Options -> select Microsoft Exchange -> Delete).
- Add a server source (Menu -> Add Server Source).
- Enter www.nuevasync.com under Server Address.
- Make sure that the encrypted (SSL) connection box is checked and select Next.
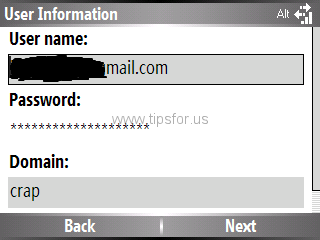
- Enter your NuevaSync username (your_name@mail.com) and password.
- Under Domain, enter anything you want. The field is required to continue, but NuevaSync supposedly doesn’t use it (If this area is grey, this just means that you’re lucky enough to own a newer device and can proceed without entering anything). I entered “crap” for my domain.
- Press Next.
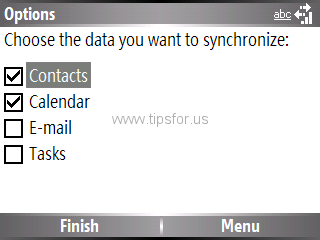
- The last screen shows the data available to sync (Contacts, Calendar, E-mail, Tasks). At the time of this writing, NuevaSync only supports syncing Contacts and Calendar. Leave the others unchecked.
- Press Finish. Your device should now attempt an initial sync. If it does not connect, check your login information again. If it syncs, you’re in business.
Here are three slides that show the process on my smartphone:

At this point, your Contacts should have been sent to and synced with Plaxo. Let’s verify this: Manually log in to your Plaxo account, click People -> Address Book. See your contacts? If so, try adding a contact on your mobile device. It should soon show up in Plaxo. Try deleting that same contact in Plaxo. At the next sync, did it also disappear from your phone?
Go on to the next page (below).
Step Three – Your Computer
The third step involves configuring Mozilla Thunderbird. Once again, there are two main steps: telling it how to connect to Plaxo, and telling it how to connect to Google Calendar.
1. Connecting Thunderbird to Plaxo.
Before we begin this section, I suggest exporting and then removing any contacts you may already have in your Thunderbird address book. While this is not strictly necessary, there is a risk of creating duplicate entries in Plaxo, and then on your mobile device.
Plaxo offers a number of downloads to sync data to their network. Take a look at their download page. In addition to Thunderbird, they currently offer add-ons for Outlook and Outlook Express, plus Mac OS X Address Book. Yes, they also offer an add-on directly for Windows Mobile (based on the Funambol client, actually), but before you get too excited, the Windows Mobile add-on requires the Plaxo Premium service. Oh well, that’s why we have NuevaSync.
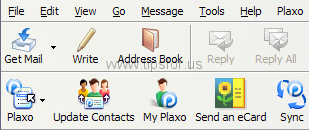
Grab the Plaxo Thunderbird add-on. Install it like you would any other extension (Start Thunderbird, go to Tools -> Add-ons -> click on Install, browse to the XPI file).
After you restart Thunderbird, you will see a new toolbar for Plaxo. Simply click the Sync button to begin the configuration and initial sync.
Follow the prompts, filling in your Plaxo username and password as required. Once configured, Thunderbird will now connect directly to your Plaxo account and sync with your online address book. Oh, I suggest going to the Plaxo menu -> Preferences, and make sure that Manual Sync in NOT checked.
At this point, Contacts in Plaxo, your mobile device, and Thunderbird should all be synchronized. If you add a contact to Thunderbird, it will appear automatically in Plaxo, and then on your phone. The reverse is also true. For instance, if you delete a contact on your phone, at the next sync it will be removed from Plaxo and then from Thunderbird. Neat, huh?
2. Connecting Thunderbird to Google Calendar.
The final step involves telling Thunderbird how to connect to Google Calendar. While you could use the Mozilla Sunbird calendar program, I suggest grabbing the Lightning add-on that integrates a calendar directly into Thunderbird. Install the Lightning XPI the same way you installed the Plaxo add-on (if you receive a warning, but sure that you are attempting to install Lighting into Thunderbird and not Firefox!). Of course, restart Thunderbird to finalize the Lightning installation.
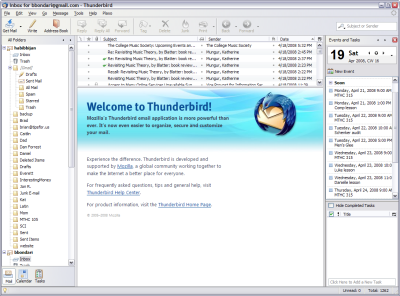
Re-launch Thunderbird, and you should see a new sidebar on the right for Events and Tasks.
Before you start manually adding events to your new calendar, we need to tell it how to sync with the mighty Google Calendar. To do so, we’ll use the slick Provider add-on for Thunderbird, which adds bi-directional sync capability between the Lightning add-on that you just installed and GCal. Download, install the Provider XPI, and re-launch Thunderbird just like you did before.
You’re almost done. All that’s left is to connect your local Lightning calendar to Google. This process takes a few steps, but hang in there. You only have to do it once.
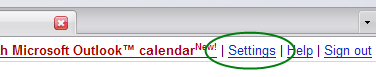
First, log into your Google Calendar account. Click the Settings link near the top-right corner.
Under Calendar Settings, click the Calendars link, and then select your calendar.
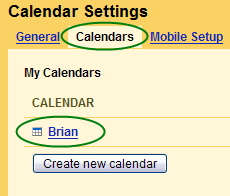
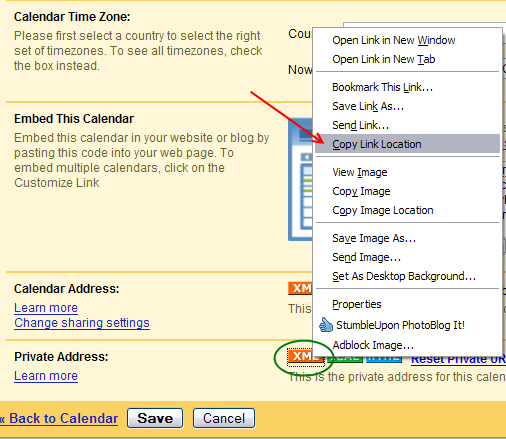
Once your calendar options expand, look near the bottom of the page. Right-click the XML button to the right of Private Address and copy its location.
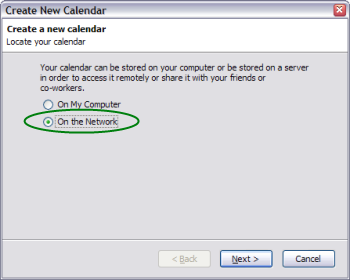
At this point, return to Thunderbird and select the Calendar button in the bottom-left corner. Now, create a new calendar by choosing:
File -> New -> Calendar…
A new window will spawn asking where you would like to store the calendar. Choose On the Network.
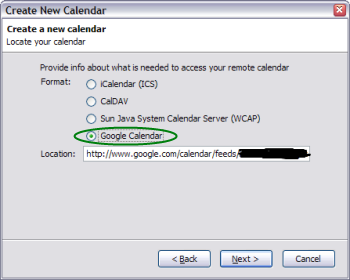
On the next screen, choose Google Calendar as the Format (this is the option that the Provider add-on creates), and paste the XML location that you previously copied into the Location slot.
Finally, enter your Gmail address and password. Voila! Your Lightning Calendar will now populate with events already created on your Google Calendar.
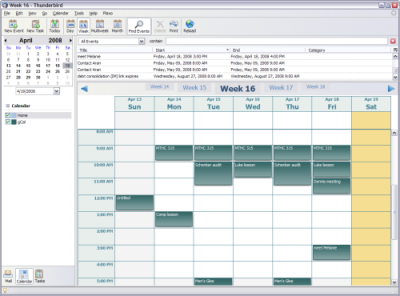
The End Result
Holy moly! Did you read all the way to this point? If so, congratulations! You should now have a completely functional and synchronized setup. But don’t just take my word for it. Try it yourself.
Try adding an event to your Lightning Calendar. Within a total of 15 minutes, it should show up on Google Calendar, followed by Plaxo’s Calendar AND your mobile device. Now delete that event on your mobile device. Within another 15 minutes, it should no longer exist anywhere in your setup. It works the same way for Contacts. Totally awesome.
Again, remember that some of these are still Beta products, and there may be outages or strange glitches. I’ve noticed a couple times that ActiveSync on my MOTO Q has trouble reaching the NuevaSync server and won’t sync for a few hours, but eventually it comes back.
The only potential problem I potentially see with the setup I have just described is if NuevaSync decides to require a paid subscription service once they come out of Beta. I don’t know what they are planning, but I certainly would not mind an ad or two, plus the option to donate. Their service is certainly worthy of many generous donations.
Did this process work for you? Let me know in the comments. Also, as you might imagine, this article took a LONG time to research and write, so if you found it useful, please spread the word by giving it a Stumble, a Digg, a Mixx, or whatever.
Also, please subscribe to our feed for future updates.